Welcome to My New Website

I spent the past few days creating a new website for my domain ricoberger.de. Previously, I only used the domain as a landing page with links to my social media profiles. This time, I wanted to add my cheat sheets, which were previously hosted in my ricoberger/cheat-sheets GitHub repository. I also aimed to include a small blog where I can write about topics I'm interested in. In the following post, we will explore the technologies used to create the website and the features it offers.

To include my cheat sheets on the website, I decided to create my own site
generator in Go instead of using an existing static site
generator like Hugo. The site generator is located in the
main.go file and
utilizes the html/template package to
generate HTML files for the website based on various templates available in the
templates
directory.
Every site uses the
base.html
template, which provides the basic HTML layout structure, including the <head>
tag and site navigation. We then select a specific template for each site to
generate the final HTML layout using the buildTemplate function. We also
provide a destination path to the function, indicating where the site will be
available and where the index.html file will be created. Finally, we can pass
a Data struct to the template, which includes the Metadata for each site and
custom data specific to each site.
<!doctype html>
<html lang="en">
  <head>
    <title>{{ .Metadata.Title }}</title>
  </head>

  <body>
    <div><!-- Site Navigation --></div>

    {{ template "content" . }}
  </body>
</html>
{{ define "content" }}
<div><!-- Site Content --></div>
{{ end }}
type Data struct {
	Metadata Metadata
	Content  any
}

type Metadata struct {
	Title       string
	Description string
	Author      string
	Keywords    []string
	BaseUrl     string
	Url         string
	Image       string
	Prism       bool
}

func buildTemplate(tmpl string, distPath string, data Data) error {
	if err := os.MkdirAll(distPath, os.ModePerm); err != nil {
		return err
	}

	templates, err := template.New("base.html").Funcs(template.FuncMap{
		"formatMarkdown": func(s string) template.HTML {
			md := goldmark.New(
				goldmark.WithExtensions(
					extension.Table,
					extension.Strikethrough,
				),
				goldmark.WithRendererOptions(
					html.WithUnsafe(),
				),
			)

			var buf bytes.Buffer
			if err := md.Convert([]byte(s), &buf); err != nil {
				slog.Error("Failed to convert markdown", slog.Any("error", err))
			}
			return template.HTML(buf.String())
		},
	}).ParseFiles("templates/base.html", fmt.Sprintf("templates/%s.html", tmpl))
	if err != nil {
		return err
	}

	f, err := os.Create(fmt.Sprintf("%s/index.html", distPath))
	if err != nil {
		return err
	}

	if err := templates.Execute(f, data); err != nil {
		return err
	}

	return nil
}
For the website's styling, we use Tailwind CSS. All
our styles are defined in the
input.css
file, which is used to generate the final CSS file (output.css) using
@tailwindcss/cli.
In the input.css file, we specify the location of the source files so that
Tailwind can detect all the used classes. We also define some theme variables
and the styling for each HTML tag used.
@import "tailwindcss" source(none);

@source "../../**/*.html";

/* The used colors are based on the awesome Catppuccin theme: https://catppuccin.com/ */
@theme {
  --color-base: #24273a;
  --color-mantle: #1e2030;
  --color-crust: #181926;
  --color-surface: #5b6078;
  --color-text: #cad3f5;
  --color-primary: #8aadf4;
  --color-red: #ed8796;
  --color-yellow: #eed49f;
  --color-green: #a6da95;
  --color-blue: #8aadf4;
}

@layer base {
  body {
    @apply bg-base text-text;
  }

  /* ... */
}
Last but not least, we are using Alpine.js and Tailwind CSS to create a user-friendly dropdown menu for small screens.
<div
  x-data="{ mobileMenuIsOpen: false }"
  x-on:click.away="mobileMenuIsOpen = false"
>
  <!-- Site navigation for large screen -->
  <div class="hidden md:flex">
    <div>
      <a href="/">Home</a>
    </div>
    <div>
      <a href="/about/">About</a>
    </div>
  </div>

  <!-- Open / close button for the site navigation on small screens -->
  <button x-on:click="mobileMenuIsOpen = !mobileMenuIsOpen" class="md:hidden">
    <div x-cloak x-show="!mobileMenuIsOpen">Open</div>
    <div x-cloak x-show="mobileMenuIsOpen">Close</div>
  </button>

  <!-- Site navigation for small screens -->
  <div x-cloak x-show="mobileMenuIsOpen" id="mobileMenu" class="md:hidden">
    <div class="py-4">
      <a href="/">Home</a>
    </div>
    <div class="py-4">
      <a href="/about/">About</a>
    </div>
  </div>
</div>
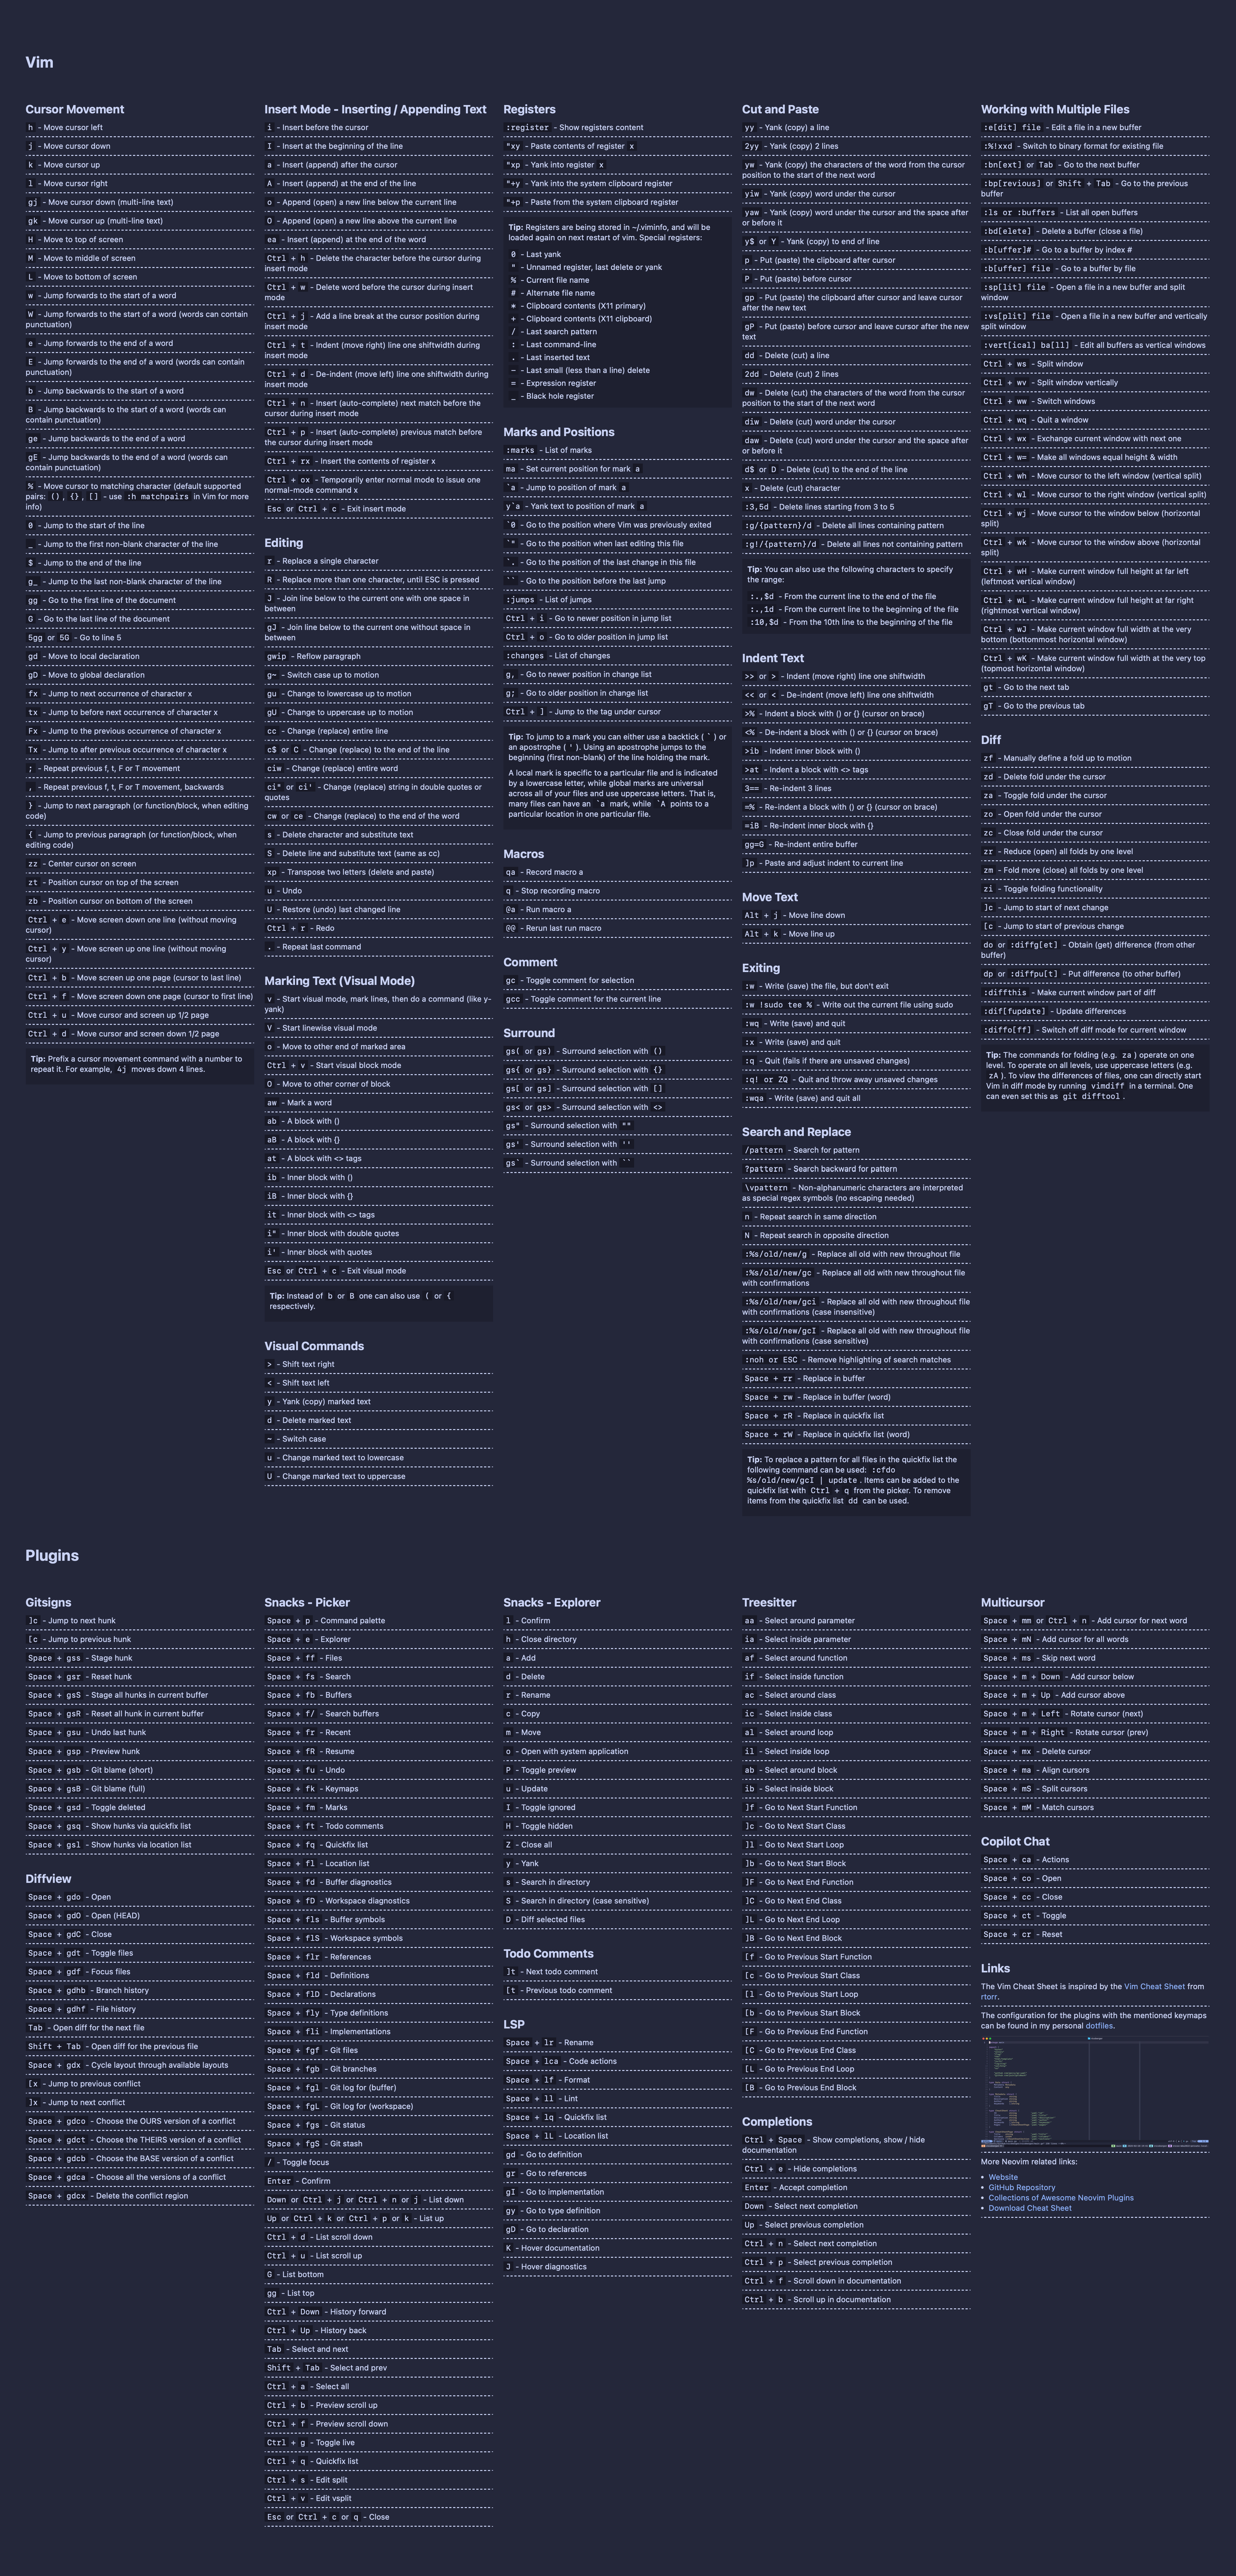
Cheat Sheets
As mentioned at the beginning of the post, an important aspect for me was the ability to include my cheat sheets on the websites. The cheat sheets are written as YAML files and have the following structure:
---
# The title, description, author and keywords for the cheat sheet
title: Vim
description: Vim Cheat Sheet
author: Rico Berger
keywords:
  - Vim
  - Neovim
# Each cheat sheet can have multiple pages with a title and a defined number of
# columns
pages:
  - title: Vim
    columns: 5
    # Each page of a cheat sheet can have multiple sections with a title, which
    # are rendered dynamically, within the defined number of columns
    sections:
      - title: Registers
        # Each section can have multiple items, which are written in Markdown
        items:
          - "`:register` - Show registers content"
          - ...
        # Each section can also have a tip, which is rendered as a box below the
        # defined items. Besides the actual description, each tip can also have
        # a list of items
        tip:
          description: |
            "**Tip:** Registers are being stored in ~/.viminfo, and will be
            loaded again on next restart of vim. Special registers:"
          items:
            - "`0` - Last yank"
            - ...
The YAML files are decoded using the github.com/goccy/go-yaml package. Then we
are using the
cheat-sheet.html
template to render the cheat sheet via the buildTemplate function. The decoded
cheat sheet is passed to the function within the Data struct. The result for
the rendered cheat sheet then looks as follows
(Vim):
Blog Posts
Blog posts are written as markdown files and rendered via the
blog-post.html
template. The markdown files are parsed and rendered to HTML via the
github.com/yuin/goldmark package. Each markdown file also contains a metadata
section with the following information:
---
Title: Welcome to My New Website
Description: |
  I spent the past few days creating a new website for my domain ricoberger.de.
  Previously, I only used the domain as a landing page with links to my social
  media profiles. This time, I wanted to add my cheat sheets, which were
  previously hosted in my ricoberger/cheat-sheets GitHub repository. I also
  aimed to include a small blog where I can write about topics I'm interested
  in. In the following post, we will explore the technologies used to create the
  website and the features it offers.
AuthorName: Rico Berger
AuthorTitle: Site Reliability Engineer
AuthorImage: /assets/img/authors/ricoberger.webp
PublishedAt: 2025-02-23 15:00:00
Tags:
  - alpinejs
  - blog
  - cheat-sheets
  - go
  - projects
  - tailwindcss
Image: /blog/posts/welcome-to-my-wew-website/assets/landing-page.png
---
The document metadata is parsed using the github.com/yuin/goldmark-meta
extension for goldmark and is used to render the header of each blog post and
the meta tags in the HTML file. We include the metadata for the
Open Graph protocol and
X Cards
in every blog post, to make them look great when they are shared:
<meta property="og:type" content="website" />
<meta property="og:title" content="{{ .Metadata.Title }}" />
<meta property="og:description" content="{{ .Metadata.Description }}" />
<meta property="og:url" content="{{ .Metadata.BaseUrl }}{{ .Metadata.Url }}" />
<meta
  property="og:image"
  content="{{ .Metadata.BaseUrl }}{{ .Metadata.Image }}"
/>

<meta name="twitter:card" content="summary_large_image" />
<meta name="twitter:site" content="@rico_berger" />
<meta name="twitter:title" content="{{ .Metadata.Title }}" />
<meta name="twitter:description" content="{{ .Metadata.Description }}" />
<meta
  name="twitter:image"
  content="{{ .Metadata.BaseUrl }}{{ .Metadata.Image }}"
/>
Since I'm a big fan of RSS feeds (you might want to have a look at
FeedDeck 😉), we also include an RSS feed for the blog
and an RSS feed for each tag, which can be specified for a blog post. The RSS
feed is generated using the buildRssFeed function. While generating the feed
and creating the feed.xml file, we go through the parsed
HTML of each post to replace all relative links with absolute ones via the
github.com/PuerkitoBio/goquery package.
Hosting via GitHub Pages
To host the new website, we are using GitHub Pages
like for the old website. GitHub Pages is perfect for hosting static sites and
integrates very well with GitHub Actions.
Within the
deploy.yaml
GitHub Action, we are building and deploying our website:
---
name: Deploy

on:
  push:
    branches:
      - main

jobs:
  build-website:
    name: Build Website
    runs-on: ubuntu-latest
    permissions:
      contents: read
      pages: write
      id-token: write

    steps:
      # Checkout the repository, setup Go and Node.js, install the Go and
      # Node.js dependencies and build the "generator" binary
      - name: Checkout
        uses: actions/checkout@v4

      - name: Setup Go
        uses: actions/setup-go@v5
        with:
          go-version-file: go.mod
          cache: true
          cache-dependency-path: go.sum

      - name: Setup Node
        uses: actions/setup-node@v4
        with:
          node-version: "20"
          cache: npm
          cache-dependency-path: package-lock.json

      - name: Setup Pages
        uses: actions/configure-pages@v5

      - name: Install Dependencies / Build Binary
        run: |
          go mod download
          go build -o generator .
          npm install

      # Run the generator to create the static files for our website in the
      # "dist" directory
      #
      # To be able to use a custom domain for our GitHub page we also create a
      # file named "CNAME" within the "dist" directory, which contains our
      # custom domain (see https://docs.github.com/en/pages/configuring-a-custom-domain-for-your-github-pages-site/managing-a-custom-domain-for-your-github-pages-site#configuring-a-subdomain)
      - name: Generate Website
        run: |
          ./generator
          npm run build
          echo "ricoberger.de" > ./dist/CNAME

      # In the last build step we upload the "dist" directory as artifact, so
      # that it can be deployed to a GitHub Page
      - name: Upload Artifact
        uses: actions/upload-pages-artifact@v3
        with:
          path: ./dist

  deploy-website:
    name: Deploy Website
    runs-on: ubuntu-latest
    needs: build-website
    permissions:
      contents: read
      pages: write
      id-token: write
    environment:
      name: github-pages
      url: ${{ steps.deployment.outputs.page_url }}

    # Deploy the uploaded artifact from the build job to GitHub Pages
    steps:
      - name: Deploy to GitHub Pages
        id: deployment
        uses: actions/deploy-pages@v4
Since we are using GitHub Pages for hosting our site, we can also create a
custom 404 page,
by placing a file named 404.html (generated via the
404.html
template) in the root directory of our website. This site will display a custom
404 error page when people try to access nonexistent pages on our site.
Final Words
As we conclude this blog post, I hope you gained a better understanding of the internals behind ricoberger.de and perhaps learned something new. I aim to enhance my writing skills in future posts. If you don't want to miss them, feel free to subscribe to the RSS feed or follow me on social media:
![]()
![]()
![]()
![]()
![]()
![]()
![]()
If you have any suggestions for future cheat sheets, blog posts, or if you have some nice articles about the topics of Site Reliability Engineering, Platform Engineering, Cloud Native, or Kubernetes, feel free to contact me via social media or create an issue in my GitHub repository.